I'm THE Cleric?!
I can't believe I haven't updated anything here about making Jester. She was a project I started before Covid and very slowly (Covid pretty much coincided with my chronic fatigue period) continued during it. I mostly finished earlier but then did a couple of small touch ups for the Desucon craftmanship competition this year.

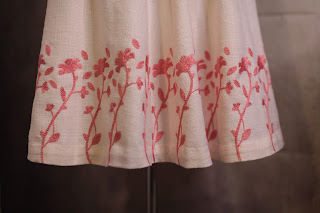
She was a lovely materials and techniques costume. The underskirt and shirt are loosely woven off white cotton that I embroidered with pearl cotton thread. The sleeve embroidery is double sided since I didn't want to line them to make them any heavier than necessary. I made a stamp and used a pink pastel to press on the pattern to see where to embroider.
I decided to go with a separate shirt and skirt because I wanted to be able to make sure the hem stays on place in relation to the blue top skirt, so the skirt layers are a single piece.
The blue top layer is linen, and the waistband is actually a pretty interesting, I didn't want the opening on the underskirt to be visible from between the blue flaps, which is a logical place for them to attach, so half of one of them is more of a wrap piece that attaches over the opening all the way to the side.


 |
| Some of the embroidery showing through on the sleeves indicating where to stitch |
The underskirt is made from old cotton fabric from recycling, and I've always waited for an opportunity to make my own bobbin lace for a costume. The trouble is it has a very specific look and I honestly have yet to find a design that would clearly have bobbin lace in it.. So I though hey, I'll just make some and slap it on the underskirt. The petticoat isn't visible on the reference, so it doesn't really change the design in any way, and having a handmade lace petticoat fits Jester's character perfectly in my mind. Since it wasn't anything "accurate" I also didn't want use too much time on it so I opted for a narrow simple but pretty lace edging.


Director: Kiipy


 |
| Photographer: Santtu Pajukanta |
 |
| Photographer: Nyymix |
 |
| Photographer: Tytti Levänen |


1 comments
🚨🚨 YOU EVER GOT SCAMMED, THEN YOU SHOULD READ THIS 🚨🚨🚨
ReplyDeleteYou could probably get your money back, and I said probably, This is because most scammers don't move the money to a bank account, most scammers move it to a crypto currency wallet or a local money saving platforms, this way they stay undetected and noticed by authorities.
What you have to keep in mind is, this crypto wallet can be reported or hacked into, and this is what we do.
WHO ARE WE⁉️ YOU MIGHT ASK❗❕❗❕
We are ⭐PYTHONAX⭐ a group of skilled and experienced internet and computer experts. We have refocused our work force into tracking down scammers and helping victims of scam recover their money, or what's left of it. Using our experience in transactions tracking and jail breaking, we can now guarantee scam victims an opportunity to recover their money.
There are so many ways to get scammed in the world we live in today, majority of this scams are internet based scam, one of the major disadvantages of the internet. Here are examples of scams we have dealt with and can help such victims to this scams as well-:
❌Cryptocurrency investments scammed victims.
❌Forex/Binary Option investments scam victims.
❌Buying and Selling scam victims.
❌Dating & Romance scam victims.
❌Loans scams victims.
❌Housing & Estate Investments Scam victims. E.t.c.
How services are simple and and a breakdown of each steps of the process we will take to help you get your money back would be explained and told to you, what we do isn't illegal, we try and follow the rules and make sure you aren't involved in any crime. You can choose to remain anonymous, your personal info wouldn't be required of you, all we need are infos regarding the scam, infos like-:
1️⃣ Total Amount of what you were scammed.
2️⃣ The type of scam you were involved in.
3️⃣ The means of Communication you used in communicating with the scammers. Eg, emails, numbers or social media handles......
4️⃣ Details of which you used to make payments and transactions ID.
Do not feel shy or ashamed or stupid, this scammers are really good at what they do, they make everything look so real and convince and very very real like the actual real stuff.
Use this emails below to contact us-:
PYTHONAXHELP@PROTONMAIL.COM
PYTHONAXSERVICES@PROTONMAIL.COM
We assure you of no form of judgmets or guilt, we are professionals and only want to help.