Snow White progress
I finished Snow White nicely before Tracon so here's some insight on the rest of the process with some good ol' making of -photos to go along.
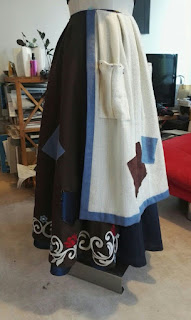
First thing I did after finishing the hem embroidery was line the top skirt. I didn't want the underside of the embroidery to be seen and since it also has holes it would be easier to keep them from fraying too much when I could use fabric glue to attach the layers. Next up I also made the skirt. I simple half circle skirt, left it to hang for a day or two and then hand stitched the hem with an invisible stitch.
The patches were made from two fabrics I picked up for free from the recycling center. I treated the edges with fabric glue after fraying so they wouldn't fray more on they're own since the weave was pretty loose.
I marked where I wanted the holes before cutting in to the fabric. Do you know the feeling when you've toiled on something tedious for a very long time and then you sort of need to destroy it? Yeah that feeling. Why's it got to have holes??
The apron was made from some sort of tablecloth or decorative towel, picked up from the recycling center. It would've been impossible to find an exact match for a Barbie scale patterned weave, so I felt it was a surprisingly good match. I think I've picked it up for our Otoyo props back in the day, and it didn't get used back then. The shape on the doll is an A shape, but in such a tiny scale fabric stays up more easily so it's a plausible shape. I figured pleating would help to have the volume hopefully flare a bit at the bottom but avoid the awkward drooping of the bottom edges when it doesn't have enough stiffness to support the wider bottom.
For the bottom of the apron I found the prettiest, softest lace... and only used the very bottom of it oTL. But I'm still happy how well it works.
I made the bow at this point too. Very simple, over a plastic headband. The bow has crinoline inside and I managed to break one of my good needles while sewing through too..
This is when I realized I only had the blouse and corselet left and could easily get this done for Tracon. I was leaving for Japan and the embroideries were an excellent time killer to bring to the plane and train rides. I started by mapping out the patterns. For the collar I made stencils to copy the patterns, and for the armbands I sketched them out with a disappearing fabric marker. Then I went over everything with a sewing thread. It's the most convenient way to copy the patterns when I work slow and carry the pieces with me, pens and other tracing methods tend to fade away. I think I actually enjoyed making the blouse embroideries the most.
The patterns on the corselet pieces I traced the same way I did the hem. Tracing on a pattern paper and using the prick & dust method, then using the sewing thread.
I made the panels separately and was really nervous about the matching, but it actually turned out super good! Only needed a few stitches to correct some places, but all in all very good. It came out a tab big, saying it could be a little tighter when laced, but at least it won't be too uncomfortable. It's also not made to be a corset so it obviously doesn't have the same sturdiness so maybe it's a good thing it doesn't get the same strain.
(If you're wondering about all the green fabric in my photos lately, I got it for free from work and there's quite a bit so I'm using it whenever applicable.)
I used the same pattern I made for Elsa, and it turned out ok. Obviously I'm not wearing all the skirt layers here so the bottom fit isn't quite right but I'm pretty happy with the shape still.


0 comments